By Timothy Jordan, Developer Advocate
Sending messages on Android Wear feels as easy as it was to pass notes back in school. Remember when your friends always felt nearby? That feeling is why I love staying in touch with friends and family using my wearable.
Your messaging app likely already works on Android Wear. With just a few more lines of code you can unlock simple but powerful features that let your users communicate even more effortlessly.
Message notifications for free
If your Android app uses notifications to let the user know about new messages, these will work automatically on their wearable. That is, when you build notifications with the NotificationCompat.Builder class, the system takes care of displaying them properly, whether they appear on a handheld or wearable. Also, an "Open on phone" action will be added so it's easy for the user to reply via the app on their handheld.

Google+ Hangouts message.
Reply like a champ
Messages on Wear get really exciting when you can reply directly from the watch with your voice. In addition to being super convenient, this always gives me a Dick Tracy thrill� but maybe that's just me. =]
To add this functionality, it's as simple as adding an action to the notification via WearableExtender that includes a RemoteInput to your notification. After the user replies, you'll just grab their voice input as a string from the RemoteInput included in the Intent. You can even include text responses the user can easily select from a list by passing an array of them to the setChoices method of the RemoteInput. More details and code can be found here.

WhatsApp message with the reply by voice action.
See who is texting
Messages are more meaningful when you are connected to the sender. That's why we recommend you include the photo of the sender as the background of the notification. As soon as the user taps into the message, they also see who it's from, which will make it matter more (or maybe that other thing, depending on who it is).
You should add a photo with a resolution of at least 400x400, but we recommend 640x400. With the larger size, the background will be given parallax scrolling. If the background is to be included in the apk, place it in the res/drawable-nodpi directory. Then call setBackground() on your WearableExtender and add it to your notification. More details and code can be found here.

Path Talk message with a clear picture of the sender.
Custom actions
Basic notifications with reply by voice and a good background image are the most important parts to get done right away. But why stop there? It's easy to extend the unique parts of your service to the wearable. A simple first step is adding in a custom action the way Omlet does. These are just actions defined with the WearableExtender that raise an intent on the handheld.

Omlet includes two extra actions with every message: Like and Check-In. Check-In sends along the user's current location.
Custom Layouts
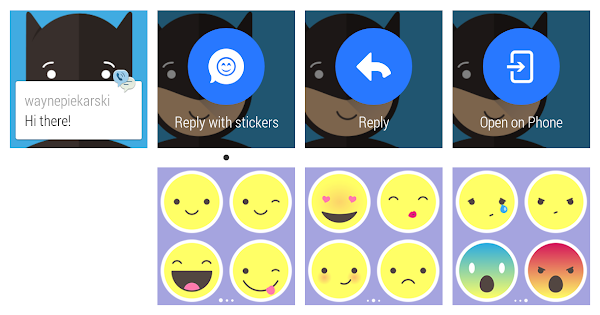
Custom interaction on the wearable, like the following example from TextMe, is straightforward to implement. They have what appears to be a simple notification with an action that allows the user to select an emoticon. However, to show this emoticon picker, they are actually issuing a notification from the wearable. The round trip looks something like this:
- The handheld gets a new message, issues a notification
setLocalOnly(True), and sends a message to the wearable using the Data Layer API - The wearable receives that message using the
WearableListenerServiceand issues a custom notification with aPendingIntentto launch an activity when the user views the notification - That activity has a custom layout defined with the Wearable UI Library
- Once the user selects an emoticon, the wearable sends a message back to the handheld
- The handheld receives that message and sends it along to the server
Custom layouts are documented in more depth here.

TextMe allows users to reply with a quick emoticon.
Next steps
Make your messaging service awesome by providing rich functionality on the user's wearable. It's easy to get started and easy to go further. It all starts at developer.android.com/wear.
No comments:
Post a Comment